Solid state drives (SSDs) deliver phenomenal performance and crazy fast boot times, and they are much more resilient to physical damage from vibration or sudden movement than traditional mechanical hard drives with spinning platters, but they do have a few weaknesses. Here I’m going to cover exactly why SSDs wear out and easy steps you can take to ensure your solid state drive is a great investment, not a great frustration.
When an SSD fails, it fails.
Recently I purchased a brand new Patriot Torch 60GB. I ran a few benchmarks on it, and put it into service into a secondary laptop of mine. Well, with just a few hours of use on it, it simply died with no warning – the ThinkPad froze, and upon rebooting the SSD was simply gone, and instead of showing up in the BIOS as the Patriot model it previous was, it simply showed up as PS3109S9, which was the type of controller it used. My point? Often times, mechanical hard drives show some warning signs prior to failure, such as clicking noises, excessive vibration, etc, SSDs simply die.
While this specific premature failure was due to poor quality components and/or lacking quality control, not wearing out, an SSD that has reached the end of its lifespan will usually fail similarly, with no warning. In theory, the SSD should simply become read-only, but in real life I’ve never seen this happen, and instead the data is simply gone, that’s why it’s so important you read on (and no matter what, have a backup!)
First off, Buy a Quality SSD
You’ve probably heard the saying, “you can’t polish a turd.” Well, solid state drives are no different. From the quality of the NAND to the features of the controller and its firmware, every SSD is different. I prefer SSDs from Intel, Crucial, Samsung, or Kingston, in that order (click those links to view their current offerings on Amazon.com)
TRIM
Why you need TRIM and how it works
TRIM is hands down the most important thing when it comes to preventing performance degradation over time as well as keeping the flash memory (aka NAND) inside your SSD in good condition.
To understand why TRIM is important, you need some background information on how SSDs handle file deletion different than a mechanical hard drive. When you delete a file from your computer, it’s not actually physically deleted from the media (whether it be an SSD or HDD) – the space is simply marked as empty by the operating system, and next time the OS wants to use that space it’s overwritten.
On an HDD, this is no problem, as the drive will simply overwrite the data when it’s time to do so – there is no difference in performance between writing data to a portion of the disk surface that previously contained a file and a spot that never contained any data (like on a new drive, for example).
However, on an SSD, the whole situation is different. To write to the NAND that was previously occupied, it must erase the old data, and then write the new data. That in and of itself wouldn’t really be the end of the world, but then you have another factor that comes into play – how SSDs store data.
An SSD stores data in tiny groups of flash memory cells of about 4-16KB, which are then grouped into 512KB blocks. If you want to actually erase a file, a limitation of how SSDs work is that the entire 512KB block needs to be erased, even if only one little bit of data in there is going to be erased. So, the SSD must read the whole block, cache it, erase the whole block, modify the data in cache, and write it back. Not only does this take a long time (leading to a noticeable decrease in performance, but it leads to write amplification.
Write amplification is when you write X amount of data to the SSD but in reality a larger amount of writes are taking place on the NAND. Since write cycles of the NAND are not infinite, this is a bad thing.
Requirements to enable TRIM
SATA Controller: Pretty much all modern SATA controllers (whether on the motherboard or via a PCI-express SATA card) support TRIM. Unfortunately, almost all hardware RAID controllers (LSI, Adaptec, Dell Perc, etc) do NOT support TRIM at this time, so if you’re using hardware RAID you can kiss your SSDs goodbye. OK, not really – I’ve seen many consumer grade SSDs working in hardware RAID1/10 RAID arrays for years under high load with minimal issues, but I still don’t recommend it. It’s worth noting that some Intel onboard RAID configurations on 7-series or newer chipsets do indeed support TRIM.
Software: Older operating systems that were designed before SSDs became mainstream don’t support TRIM, such as Windows XP and Windows Vista. If you’re using an SSD, be sure to use Windows 7 or later. There’s conflicting information on this, but I’ve heard that on Windows 7, you had to run the Windows Experience Index benchmark (Control Panel>System and Security>System) at least once after installing Windows 7 to make it realize you had an SSD. This issue does not persist in newer versions of Windows – besides, Windows Experience Index was removed in Windows 8.1 anyway. If you absolutely need to run XP or Vista on an SSD, some of the larger SSD manufacturers (notably Intel and Samsung) have proprietary software programs (such as Intel SSD Toolbox and Samsung Magician) that can either send TRIM commands to their own brand SSDs or perform other types of optimization or “garbage collection”.
How to enable TRIM
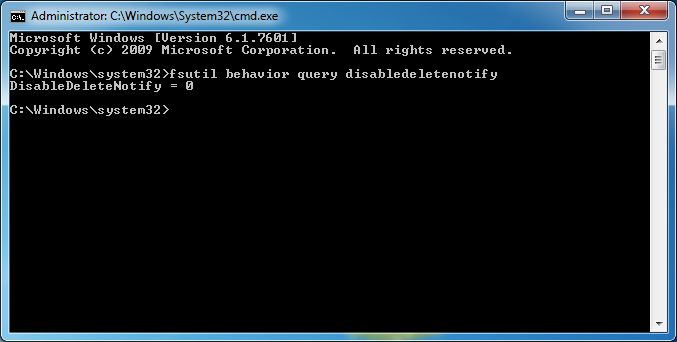
On Windows 7 and above, this is pretty easy! Simply run the following line in administrative command prompt (right click on Command Prompt>Run as Administrator) to check whether or not TRIM is enabled:
fsutil behavior query disabledeletenotify
If you get back 0, it’s ENABLED, and if you get 1 TRIM is DISABLED. Yes, it’s back-asswards, don’t ask me why, because I don’t know. here’s how it should look if it’s enabled:
If TRIM is enabled, you’re all set. If not, here’s how to enable TRIM on Windows 10 (and this should apply to Windows 7 and 8/8.1 as well):
How to check, disable, enable TRIM support in Windows 10 on TheWindowsClub.com
Under Linux, it’s a bit more complicated. Since there are so many different distros and versions, I’d suggest to just search your favorite search engine for a tutorial on how to check and enable TRIM.
NEVER Defrag your SSD!
Never, ever, EVER defragment your SSD. While defragmentation marginally speeds up hard drive performance by moving chunks of files closer to each other on the surface of the platter so the head has to move around less to read a file, it makes no difference to an SSD where the bits of the file are located, so defragmentation will not improve performance at all.
Beyond being a complete waste of time, defragmentation is a very write-heavy process that reads, erases, and writes a lot of data to the SSD. Defragmenting an SSD will use up a ton of the write cycles of the NAND, wearing it out exponentially faster than typical use.
While Windows 8 and above are much smarter about discerning that you’re using an SSD and will automatically trim the drive instead of defragmenting it, Windows 7 doesn’t always notice. Open the Disk Defragmenter program, and be sure to disable scheduled defragmentation.
Put the Page File (Windows) or Swap Partition (Linux) on a Separate Drive
While page files are less important now that RAM is cheap and plentiful, you should never disable it completely to ensure system stability. While moving the page file or swap partition to a slower mechanical drive technically makes it slower, you really shouldn’t be paging/swapping enough to make a difference. if you run out of memory, well, RAM is cheap, and if your system doesn’t support more RAM, perhaps you’ve outgrown your existing computer…
Before I get too off topic, there are two reasons you want to move your page file or swap partition off your SSD. First off, you use less space which leaves more free space for your data (and more breathing room for the solid state drive, more on that later), and second, you waste less write cycles on the ever-changing page file or swap partition.
If you use swap heavily, and don’t want to move it to a mechanical HDD, get a separate inexpensive SSD for the page file.
Running Linux? Well, there are too many different variations out there to cover each one, but you should be able to find the info using a search engine or support forum related to your distro.
How to Change Windows Page File Settings
- Control Panel
- System (in Category view, it’ll be under the System and Security section)
- Advanced system settings
- Advanced tab
- Settings in the Performance section
- Advanced tab, yet again
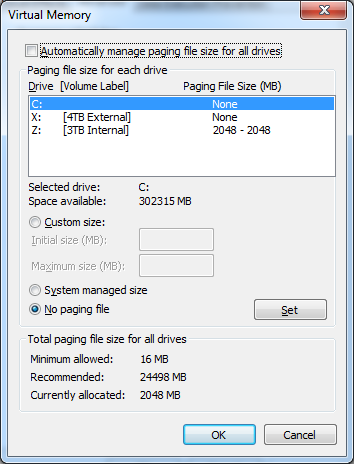
- Click change in the Virtual memory
Now that you’re in the virtual memory settings, uncheck the “Automatically manage paging file size for all drives” which will allow you to actually change the settings.
First off, select your solid state C Drive, select “No paging file”, and click the Set button.
Then, pick an alternate drive, select “custom size” and enter the same number in both the intial size and maximum size fields. Entering the same values in both fields will minimize disk fragmentation. I’d suggest entering 2048 (that’s MB, so 2GB), which will leave you enough of a page file for applications that require virtual memory, while not wasting space on your disk. Once again, hit Set to save these settings.
Then, you can click OK and close all that stuff. Reboot your computer ASAP for the new settings to take effect.
Maintain at Least 25% Free Space on your SSD
Having some free space for your computer to work with is important on a regular hard drive, but it’s even more critical to give your SSD lots of breathing room. While you might hesitate to throw away a quarter of the disk space when SSDs cost so much more per GB than a regular hard drive, buying a new SSD because you killed your old one is more expensive than paying attention to your disk usage!
Not only does more free space mean that your SSD will perform like new and not get much slower over time (as it will if it’s nearly full), but there is a direct correlation between disk usage and write amplification. Remember that the lower the write amplification factor is, the less you’re writing your NAND, and the longer your SSD is going to last.
It was common practice years ago when SSDs first became popular to actually not partition the whole drive to set aside some spare space for the controller to perform its garbage collection and wear leveling. Now with modern SSD controllers and TRIM, there is minimal benefit, so don’t bother – but just remember not to fill that drive up completely.
Keep an Eye on your SSD
Just like my first suggestion to buy a good quality SSD, this isn’t really a tip to coax a longer lifespan out of your SSD. That said, monitoring your SSD is a good idea. There are plenty of free programs you can use to check up on it, by favorite being CrystalDiskInfo. A free download, it should be able to display host writes and many other stats for most popular SSDs. Of course, your SSD manufacturer’s own software (intel SSD Toolkit, Samsung Magician, Kingston SSD Manager, Crucial Storage Executive, etc.) is probably going to always provide the most accurate data and detailed info, though for most solid state drives third party utilities like CrystalDiskInfo should provide sufficient insight into what’s up.
Conclusion
With a few minutes of your time to make sure everything’s set up right, and some common sense, your SSD will last longer than you need it to. If you have any more suggestions that will ensure those expensive little NAND chips in there stay happy, I’d love to hear them.